Gender Reveal Cookies
May contain affiliate links. Disclosure policy.
A simple decorated sugar cookie recipe is the star of the party with these Gender Reveal Cookies! Will it be pink or blue? Love sugar cookies? See all of our recipes!
Gender Reveal Cookies Tutorial
Let me first be very clear that we are not trying to make an announcement with these baby themed decorated sugar cookies. Baby days in this house are over. Sometimes I miss those days of cuddling with my chubby little babies, smiling as they make their first deep belly giggle and celebrating milestones such as taking a first step. Those were special times, but they were hard and I don’t miss the sleepless nights and long days.
We’ve passed into the teenager phase of life now, with days that are just as special, but no doubt still difficult.
One special memory-making hobby that I share with Maddie is decorating sugar cookies. We started playing around with cookie decorating about 10 months ago. We’ve learned so much and I plan to do a post dedicated to cookie decorating soon, but today I want to share with you our sugar cookie recipe and focus on these fun Gender Reveal Cookies.
I’ve always said that it’s no fair that Pinterest wasn’t around when I got married or had babies. Back in the day we had to come up with crazy creative ideas on our own or hope we had a friend that was blessed with a creative gene. A gender reveal party would be so fun!! Not fun enough for me to have another baby, though. 🙂

I found the idea for these fun sugar cookie gender reveal cookies from one of the queens of cookie decorating, The Sweet Adventures of SugarBelle. She makes her cookies just a little bit differently than I did, but I took that idea and came up with our own version.
It’s important to know that making sugar cookies is a multi-day process. Plan a day to make the cookies and the royal icing (both freeze well so this can be done in advance). Then plan another day to start decorating the cookies, an overnight drying time and another day to finish up decorating. You’re looking at about 3 days, which can be sometimes shortened a bit if you work mornings and evenings. That’s all to say “Plan Ahead”!
How to Make Cookie Pops
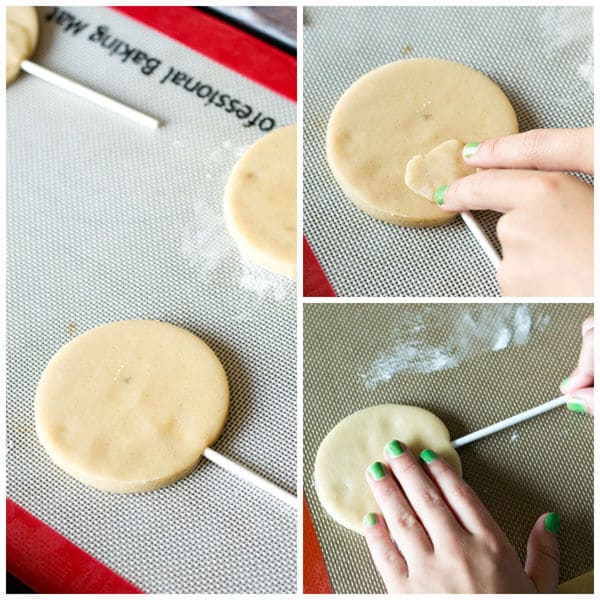
You’re going to start with our simple sugar cookie dough (which tastes amazing…simple and buttery) and roll it out to be 3/8″ thick. You want these cookies nice and thick if you are going to stick a lollipop stick in the middle. You don’t have to make the cookies into lollipops, but these were super fun! Roll the cookies out, use a 4″ circle cutter to cut the cookies and carefully poke a lollipop stick into the cookie. I found it worked best if I placed my fingers on top of the cookie to hold the dough in place while inserting the stick. (See the picture below). You’ll want to insert the stick about 1 1/2″ into the cookie.
Royal Icing Recipe
After the cookies are baked and cooled, it’s time to decorate! I use this royal icing recipe, and it needs to be mixed up and colored a day in advance so the colors can deepen and set. There are many variations of royal icing out in blog land, but I’ve found the important thing is consistency. You want the icing to flow easily so that it dries smoothly, but not so “flowy”that it runs off your cookie. Icing consistency is the thing that we struggled with the most in cookie decorating! You can find all kinds of tutorial and videos to help you, such as this one.
How to Decorate the Cookies
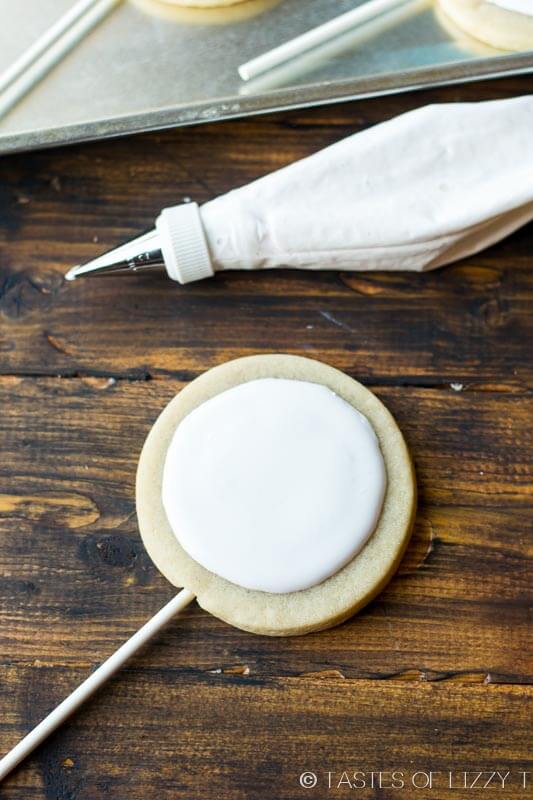
Prepare icing bags with Wilton #2 tips. When you’re ready to decorate, pipe a pink or blue circle in the middle of the cookie, leaving about 1/2″ around the perimeter of the circle. Allow this icing to set overnight.
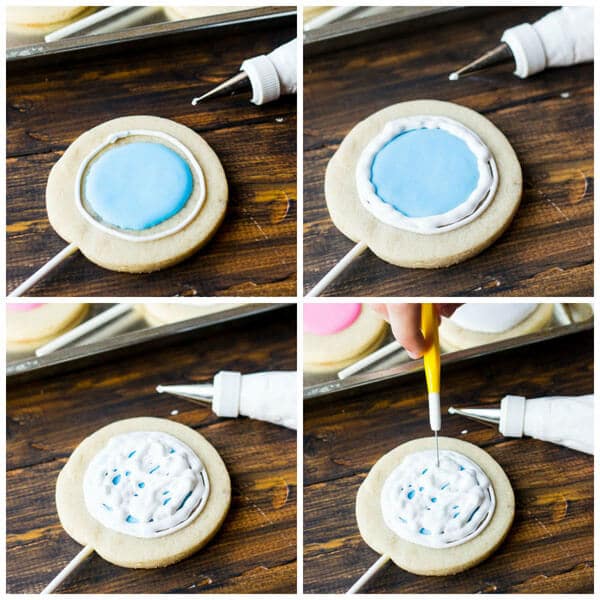
You’re then ready to cover up those pink or blue surprise colors! Using white royal icing (and by the way, use white food coloring to color the icing white. It seems silly, but trust me, it makes a beautiful, bright white and will prevent the colors from running together!) to pipe another circle just a little bit larger than the blue circle. Fill in the white and flood icing all over the blue circle. Shake the cookie gently to allow the icing to spread and come together smoothly. You can also use a scribe tool to make sure any air bubbles are out of the frosting. I can’t live without my scribe tools.
Then you get to share these cookies with your friends and give them the good news of baby boy or baby girl with the bite of a cookie. It doesn’t get much sweeter than that!
There is so much more information I’d love to share with you all about cookie decorating. In fact, if you lived close I’d have you all over for coffee and show you what we’ve learned over the past year! If cookie decorating is something you’d like to try, I’d suggest reading all you can on it. There are so many blogs and YouTube videos dedicated to just cookie decorating. I learned everything from the pros!
Enjoy this simple cut out cookie recipe, perfect for these baby shower cookies and any other cutouts you’d like.
OTHER SUGAR COOKIE RECIPES
- Chai Spiced Sugar Cookies
- Lofthouse Style Sugar Cookies
- Lemon Sugar Cookies
- Cream Cheese Sugar Cookies
- Cut Out Sugar Cookies
- Almond Sugar Cookies
- Refrigerated Sugar Cookies


Gender Reveal Cookies
A simple decorated sugar cookie recipe is the star of the party with these Gender Reveal Cookies! Will it be pink or blue?
Servings 36
Prep Time 1 hour
Cook Time 13 minutes
Total Time 1 hour 13 minutes
Ingredients
- 4 cups all purpose flour
- 1/2 teaspoon salt
- 1 1/2 cups salted butter softened
- 1 1/2 cups granulated white sugar
- 2 large eggs
- 2 teaspoons vanilla
Instructions
- In a medium bowl, combine the flour and salt with a wire whisk.
- In a stand mixer, cream the butter and sugar together. Add the eggs and vanilla and beat on medium speed until mixed well.
- Scrape down the sides of the bowl and add the flour mixture.
- Mix just until combined, being careful not to overmix.
- Divide the dough in half, gently flatten the ball into a disk and wrap tightly in plastic wrap.
- Refrigerate for 1 hour.
- On a floured surface, roll out the dough to 3/8" thick. Use a 4" circle cutter and cut as many circles as possible, re-rolling the dough scraps and cutting again.
- Place the circles on a non-stick baking sheet.
- To press the lollipop sticks into the cookie, gently place your hand on top of the circle. Push the stick about 1- 1 1/2" into the circle, being careful that the circle does not misshapen.
- Refrigerate the cookie dough for another hour.
- Preheat the oven to 325 degrees.
- Bake the cookies for 12-13 minutes, pulling the cookies out just before they start to brown.
- Immediately transfer the cookies to a flat surface to cool.
- Once the cookies are cooled, decorate as described in the blog post above.
Notes
*The amount of cookies you get will greatly depend on how thick you roll the dough and how large your cookie cutter is. I'd say you'll get anywhere from 3-5 dozen cookies with this recipe depending on those factors.










This sugar cookie recipe is perfect!! I’ve been looking for a recipe like this for years! I used it to make Christmas sugar cookies. Dough rolled very easily!. Cookies are good enough to eat even before we put the icing on!
what a fun way to celebrate a new baby! gorgeous cookies
These are such sweet and creative cookies. One of my good friends was recently looking for gender reveal ideas. To bad she already had her party. I guess I can save this one away for myself, for when I decide to have another one!
I LOVE these! They are adorable and so amazing. What a fun way to reveal a babies gender. Really these are just way cute!
These are too cute. I LOVE gender reveals! I have a round-up of ideas, and I’m going to add this to it 🙂 So fun.
These are like the most perfect cookies ever!! Love them!